The security of sensitive information stored within your cloud-based gym management software is of the highest importance to us, and given potential consequences of a breach–it should be for you too. Unauthorized individuals gaining access to the sensitive information about your business or its members stored within your system can not only lead to upset members leaving your facility and telling their friends not to join, but also legal issues as well. If your club is like the many others which are allowing staff to work from home, it is important to take measures to secure yourself against these. One such measure is through the use of incorporating an IP whitelist to limit logging in to the system to only those who have permission to do so.
An IP (Internet protocol) address is a string of numbers and full stops that identifies computers on a network using the internet. This means that any time a computer accesses your system, it has an IP unique to its geographical location. Your gym management software may utilize this information so that only computers with a specific IP that has been added to the whitelist may access the system. This means that other users outside those whitelisted locations attempting to login to the system (with their different IP) will be unsuccessful as the system will recognize this and block them from doing so.
Using GymMaster to set up an IP address whitelist is relatively straight forward. The rest of this article will outline the steps you should take to do this for your club.
Steps to setting up the whitelist.
Remember, IP addresses will be different when you log in from home, other staff members' houses or any other location. Therefore this will need to be repeated for every location you want to be able to access the system from.
Step 1: Acquiring your IP Address
First, we need to figure out the IP address of your computer. To do this, you simply need to google the phrase “What is my IP address?” This will return a number looking something like the screenshot provided below. Be sure to note this down or keep this tab open for the next step.

Step 2: Open GymMaster and Navigate to Advanced Configuration
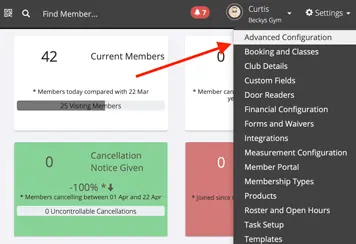
Click Settings > Advanced Configuration

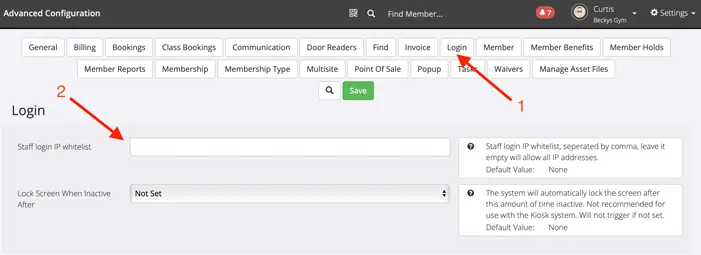
Step 3: Find the “Whitelist Staff IP Address” Setting
This is below the Login heading of the advanced configuration settings.

Step 4: Setup the whitelist
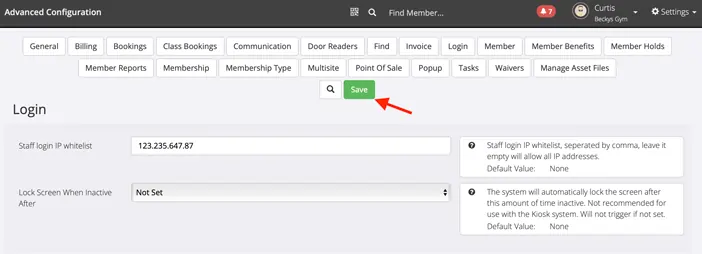
Enter in the IP address you found earlier on Google and click Save.

If you have multiple IP addresses you are whitelisting, separate these with a comma. To remove this restriction again in the future and allow all IP addresses again, all you need to do is clear the field of all IP addresses to leave it empty.

